5 Things You Need To Be Able to Do!

Here’s a senario: you are camping in the middle of the woods with no cell coverage. You are peacefully sitting by the fire, when suddenly a spark lands on a nearby piece of birchbark, which erupts in flame. It is now spreading rapidly.

If you answered either, start singing “Twinkle Twinkle Little Star”, or Run and Scream, then most definitely continue reading. If you answered Quickly grab some water and dump it on the fire, well you’re correct, but still continue reading. In situations like the one above you need to stay calm, and act quickly. But, situations like a fire expanding don’t have to happen. Yes, you can prevent these situations. One of the best ways is to know how to do certain things that will help you in situations, perhaps like the one above. Interested in learning? Yes? Then keep reading!

1. How to make and light a fire:

First, you need some materials: small dry twigs/sticks, some softball sized rocks, and matches or a lighter. With the rocks form a small circular ring of rocks about 1.5 feet in diameter. (Now, you do not have to do the rock circle, but it’s safer). Next, take your small dry twigs/sticks and make a mini tepee with them inside the rock circle. Before you light your twigs/sticks get a bucket of water, and but it by your fire, just in case, (though it’s unlikely) your fire gets out of controll. Now comes the easy part, take your lighter or match, and light the botton of your stick teepee. If you the fire isn’t spreading then light in a couple other places. Also, if needed add a few more sticks or birchbark to keep your fire burning But, make sure not to put big sticks or logs or else you’ll smother the fire.

Click here to see a video that might help you visualize the making of a fire.

2. Five basic knots you need to know how to tie:

  • Overhand Knot
  • Half Knot
  • Square Knot
  • Figure 8 Knot
  • Bowline Knot

Click here to see a Prezi I made on how you can use these knots and pictures of them.

Also, here is a good website that has some more information on these knots, and other knots.

3. Make a shelter 

Making a shelter really depends on the weather. For instance, if it is pouring freezing rain, you probably won’t have time to construct a decent stick shelter, you’d freeze before you were finished! You, instead, would want to quickly find a natural shelter, one that’s already there: a cave, tree bows, (making a make-shift roof), an overhang, (like a rock) etc. Or if you’re lucky, a man made shelter. So, that’s what you do if you need shelter right away. But, if it’s sunny, and you don’t need shelter immediately then you can construct one yourself. Another thing to consider is, do you have time to make a decent shelter that you could use for multiple days, or do you you just have time to make a quick one, (like, if dangerous weather is coming soon). If you have to act quick then you shelter will probably be more of a lean-to shelter, just to keep you safe while a storm passes. But if you have time, then you could construct more of a cabin like shelter, or depending on you environment, maybe a hammock of some sorts, if you’re in the rain forrest!

To see some examples of shelters, check out this video:

4. Find a source of water

The Rule of Threes states that a person can, “survive for three days without water.” That’s not very long, especially if you’re stranded and/or lost in the wilderness. A human needs water to survive. So if you are stranded and/or lost in the wilderness here is a list of water sources that you could look for:

  • Rain Water
  • Dew Drops, (on leaves or grass, in the morning)
  • Snow or Ice, (melt it, possibly under the sun, or over a fire)
  • Water from a stream, river, lake, or any other relatively clean body of water!*

*But, WARNING! before chugging water from a stream, river etc, YOU MUST PURIFY IT!!! There may be bacteria and diseases in water that make it unsafe to drink. So how do you purify it? Well, here are the two best to you can purify water:

  1. You can use a special water bottle that purifies that water for you. (Go here to see some.)
  2. You can boil it for at least two minutes.
So find your source of water, purify it, and chug!

5. Find Food:

Like water, food is essential to keep human beings alive. If you’re in the wilderness, (and you don’t have any food!), you can: find berries,  plants, nuts, or animals, (well some animals!). Those are pretty much the basic foods you will want to eat in the wilderness. It is very important, that, especially when you’re eating plants, or berries, (mushrooms!) you know what your doing, have an expert on it with you, or a book that specifically explains what to eat and what not to eat. Mushrooms are a great example, you may be looking for a certain edible mushroom, and find a look alike that is lethal! (Not Good)!

Click here to see a good book that you might want to buy, it’s a bit expensive, but worth it.

But, if you don’t want to buy the book, there are lots of good websites, click here to see one that I liked, about edible plants, and click here to read about edible mushrooms.

Some animals you could hunt, and then eat in the wilderness, (if you don’t have a gun) are:

  • Squirrel
  • Rabbit
  • Woodchuck
Some ways to catch these animals would be with: a trap, or a homemade bow and arrow.
Hope you enjoyed my post! Please comment if you have any ideas for improvement, or ideas for another post!

Works Cited:

http://easybib.com/key/02ee57

Ukulele

The Ukulele also know as a Uke, is a four stringed Hawaiian instrument similar to the guitar, usually used as a accompaniment to singing. Ukulele’s come in many different colors, sizes, shapes and styles. A common Ukelele looks like this:

This certain Uke is a Martain and Co., Soprano

This certain Uke is a Martain and Co., Soprano

History of the Ukulele:

There are many different legends on how the Ukulele came to be such a popular instrument; but one Hawaiian legend that I liked told the story like this…click here to read the story.

If you are familiar with the guitar then you will be familiar with the Ukulele. Click here to see a labeled picture of a Uke that I made on Prezi. Press  the + to zoom in and the – to zoom out, click and drag the screen to move around, and press Fullscreen if you want. Please comment if there are any problems, thanks. 🙂

The Ukelele comes in four different sizes, a Soprano, a Concert, a Tenor, and a Baritone.

Ukelele’s also come in different shapes and colors…

A Pink Ukulele

A Pink Ukulele

A Triangular Ukulele

A Triangular Ukulele

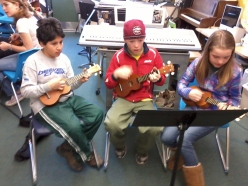
In Music we, (about 15 kids in my grade) learned how to play the Ukulele, here are some pictures of us:

Paige and Nick playing the Uke

Paige and Nick playing the Uke

Bea playing the Uke

Bea playing the Uke

Grace playing the Uke, and singing!

Grace playing the Uke, and singing!

(from left to right), Bayron, Ben O., and me playing the Ukes.

(from left to right), Bayron, Ben O., and me playing the Ukes.

If you are interested in learning to play the Ukulele and/or in buying one then I recommend clicking here, or here. The first link  goes straight to a specific Uke that you can buy, (it’s on sale and is good quality), and the second link goes to a page full of  Ukes you can buy. Enjoy!

Works Cited: http://easybib.com/key/e0d19c

Slacklining

“A balance sport that uses nylon webbing tensioned between two anchor points”, as google definitions put it. That would be slacklining. If you have never in your life heard of slacklining then think of a Tightrope, now imagine it thicker, flat, and somewhat bouncy. Also, most of the time it is about a foot off the ground. That’s a slackline. Tightropes are normally used in the Circus and people ‘daintily’ walk across them in a more proper manner. But on a slackline people do tricks and stunts, and since it is thicker you can go faster and you don’t have to worry about falling off. Slacklining, in certain manners has been around for about a thousand years. But, people say the modern day slacklining really started in 1980s with Adam Grosowsky and Jeff Ellington when they started walking on loose chains and cables alongside parking lots. Over time they went from chains to climbing webbing. Afterwards, “the sport blossomed from there among climbers in the valley, and then branched out elsewhere all over the world.” This kind of reminded me of Ben and Jerry’s; a small thing, two people selling ice cream in a garage, or two guys walking on chains can later lead to a bigger thing that spreads around the world!

Different styles of Slacklining and their definitions, (if you click on the name then it will link to a picture of that style of slacklining)

  • Urbanlining, the combination of all styles of slacklining usually done in the city.
  • Tricklining, the most common style of slacklining usually done low to the ground, where they do tons of tricks and stunts!
  • Waterlining, simply, slacklining over water.
  • Highlinging, slacklining at large distances above the ground or water, usually done with a harness, but some people do it without a harness!
  • Yoga Slacklining, doing yoga while on the slackline!
  • Freestyle Slacklining, is all about getting balance while on a slackline with no tension, providing opportunities for both swinging and static maneuvers.

This is a really cool video of a person highlining in California! Click here to watch it!

I also found a good blog about slacklining, the good information, and a video starts farther down,  http://students.expression.edu/slackliner On the blog it also shows you how to assemble a slackline, and it has a video!

I hope you liked my post! =) My next post will be on the Ukelele, so keep checking for new posts!

Works Cited: http://easybib.com/key/373550

Juggling

Last Spring my friend Eli was auditioning for the play Charlie in the Chocolate Factory, (he got in, you may have seen him), and he needed a talent. So, he decided to have juggling be his talent. After a couple months he learned, and now he’s really good. In the video below Eli does a good job explaining how to  juggle. To put it simply, you go step by step. First, you start with one ball, just throwing it up in the air and catching it. Back and forth, back and forth. Once you get good at that and get good at hand-eye coordination, you can get another ball. You throw one ball up, then as it is falling down you throw the other one up. It’s easier to learn visually, so the video should help. Don’t get frustrated if you don’t learn right away, it takes a couple months. Also, in the video it shows me learning how to juggle, you can see that I am not good at it yet!

Good video? Bad video? Comment your opinions or ideas!

Here is a bit of info on juggling…

First of all, you don’t have to just juggle balls, you can juggle: pins, napkins, rings, clubs, pretty much anything that you can throw and catch! Some of the more daring jugglers use knives, fire torches, and chainsaws. Juggling is not specifically throwing balls in the air, but can also refer to: fire dancing, hooping, foot bag, and hat manipulation, or to you having to juggle a crazy schedule!

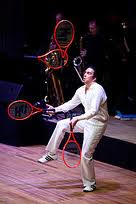
This person is juggling tennis rackets!

This person is juggling tennis rackets!

Did you know? Juggling makes your brain bigger! Now, I could ramble on and on about the brain, and a ton of scientific stuff, but I’ll keep it simple. I don’t know when, but in the journal Nature a study published, saying that learning to juggle may create certain parts of the brain to grow.
Medical News Today says, that the “latest study demonstrates an anatomical change as a result of learning – that is, the brain size actually expands.” If you want the real deal then go to this website.

If you want to learn how to juggle, and you would like to purchase some juggling balls, go this website.   The juggling balls also come with a really good, informative book called Juggling for the Complete Klutz, that I have and like!

Hope you liked my post, and that while you are reading my next post you’ll be juggling! Maybe even on a unicycle!

Just had to add this! Eli just showed me this video, of a guy juggling to the beat of the Beatles song Golden Slumbers and I couldn’t resist, so here is the URL: http://www.youtube.com/watch?v=H8f8drk

Works Cited: http://easybib.com/key/897797

Unicycling

Do you know what unicycling is? Neither did I until I went to Circus Smirkus two years ago and a clown was riding one. My brother instantly wanted to learn. After about a year he was pretty good, and then his friends Ben and Carter learned too. I am in the process of learning, I just got a unicycle for Christmas. A unicycle is like a bike but with one wheel and no handle bars or gears, (there are more differences, but those are the main ones). You turn the pedals and hold your arms out to help you balance, (like you might on a tightrope). You can also do bunny hops (when you jump up and down staying on the unicycle) and go off jumps. My favorite unicycle brand is Torker. To learn more about unicycles check out Carter’s Blog at: http://carterh10.wordpress.com/. The best way to learn how to ride the unicycle is to find something to hold onto, such as a porch railing or a counter top and just ride along holding onto it. A flat surface is best.

Here is a video that might help you, but while learning I would recommend riding along side something, unlike the guy in the video! Also, a short tip: you are always upright so if you feel like you’re going to fall just jump off and the unicycle falls instead of you. Don’t worry, it’s hard to break a unicycle!

(The Video)

This is a Torker Unicycle, you can get them in different colors. If you are interested in buying a unicycle then just search "unicycle" online and tons of hits will apear.

My friend Bea recently sent me a really cool picture of a unicycle with handlebars! Isn’t it awesome?!

A unicycle with Clipless pedals and Handlebars!

A unicycle with Handlebars!

I hope that I’ve interested you in unicycling, and if so, stop reading and start riding! *Okay, that was cheesy…but still!* Oh, and if you want to see some extreme unicycling then check out this!!!!!! Kris Holm is out of this world!!!!

(The Video)

Works Cited: http://easybib.com/key/073bef